1. Wash and rinse the Bird Butler thoroughly. Do not place the Bird Butler in the dishwasher.
2. Install the mount for the Bird Butler onto the cage. (Once the mount is installed, the bottle may be easily removed for cleaning, leaving the mounting hardware attached.) 100% of the mount for every Bird Butler is stainless steel.
3. Slide the Bird Butler onto the mount, and secure it with the wingnut. DO NOT OVERTIGHTEN THE WINGNUT! The wingnut simply prevents the Bird Butler from sliding off the mount. Overtightening may cause cracks in the bottle.
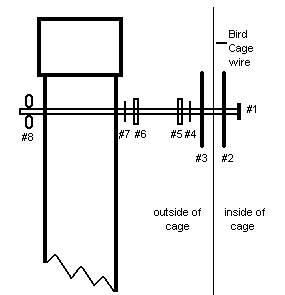
#1 = bolt #2 & #3 = flat washer #4 & # 7 = lockwasher #5 & #6 = nut #8 = wingnut
4. Fill the Bird Butler with water to the bottom of the hole that the mounting hardware runs through. ( If filled past this point, water will leak from the hole at the hardware entry point. This will stop, however, when the water level is once again below the hole.)
5. Press the stem of the valve a few times until water flows out of it. Your Bird Butler is now ready to go!
We at Birds, Etc. have found the following to work best for us when training a pet to use the Bird Butler. After the Bird Butler is attached and filled, remove all other water sources. Mark the water level on the clear tube, and check it frequently to ensure that the water level has gone down and that the animal has begun to drink from the Bird Butler. If the water level has not moved, place the original water source back into the cage until the animal has drunk from it, then once again remove the original water source. Repeat the above procedure until the animal is drinking from the Bird Butler. The majority of animals will begin using the Bird Butler the very first day.
Once again, PLEASE ensure that the animal is drinking from the Bird Butler before permanently removing other water sources.